Maybe you want a guitar nobody else owns, or maybe you just love working with your hands. Building one yourself answers both, whether you start from a parts kit or shape raw wood on a bench.
Be honest about which path fits you. A kit with a premade neck and body is within reach for a patient first-timer, while scratch building asks for real woodworking skill and the tools to match.
This guide walks through the whole thing in order, from planning the shape and scale to the wood, the hardware, the wiring, and the final finish. Each stage gets its own steps.
The video below, “Making A Custom Guitar From Scratch,” shows the kind of work and styles you might aim for as you read on.
Instructions on Building a Guitar
Building a guitar requires patience, some level of woodworking skill and lots of specialty tools. If you lack one or more of these necessities, you can still build your own guitar using a DIY guitar build kit, which are available from various manufacturers online - learn more about learning where to learn to build guitars here.
You can learn a lot about guitars by building one, and shaping a guitar to your preferences affects sound and play-ability. You’ll inevitably become a better player
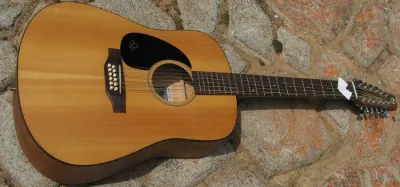
This how-to article will focus on building an acoustic guitar, which many music lovers consider to be more complex and personally satisfying instruments. The basic steps of the process include:
Planning Your Guitar
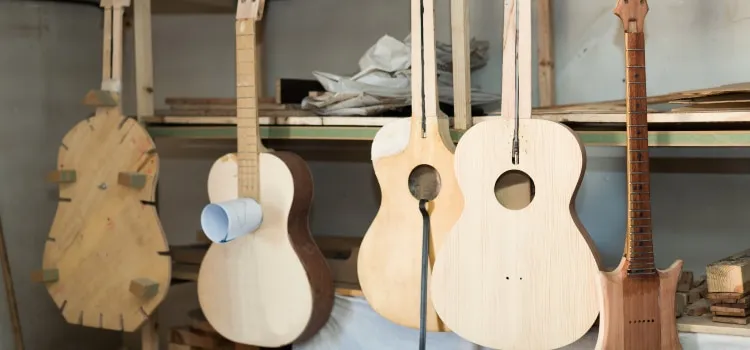
You need to select the wood for the body of the guitar and choose the style of the guitar that you want to build and create a guitar body template. Experts differ over what kind of wood to use for the top, back and sides.
Some builders recommend Sitka spruce for the top and rosewood for the rest, but you can put your personal stamp on the project by choosing your own wood after researching wood characteristics.
Maple is a hard wood that has excellent tonal qualities. The top of the guitar is also known as the soundboard, and the type of wood you choose is critical in determining sound tone.
The guitar neck is usually made from mahogany or maple.
Drawing a template is helpful. Determining the scale length is the length of the string from saddle to the nut.
Scale length determines how far apart to place the frets, classical guitars have frets about 650 mm apart. Placing the frets too close will result in a mandolin, instead of a guitar.
Frets that are further apart transform your guitar into a bass or baritone guitar.
Preparing the Wood
Cut the wood in the shape of your template using a jigsaw. The edges of the wood need to be trimmed and sanded flat for a precise fit.
You can use a block plane for the detailed work. Bending the wood for the sides depends on the shape of your custom guitar.
Bending irons are heated metal pipes used to bend the wood at around 150° C or 302° F.
During this stage, it’s helpful to cut all the pieces you need using a jig or hand saw. You should design the neck, fretboard and headstock and cut, trim and sand the parts.
Gathering Other Parts
You’ll need a capstan, which is a cylinder on the headstock with a hole for inserting the guitar strings. The nut is a piece of thin material that supports the strings, and it’s usually made of brass, ivory, ebony or synthetic materials.
You can see that the McCartney/Jackson partnership on “Ebony and Ivory” had a clear double meaning.
Tuners, aka machine heads, are needed to rotate the capstan and wind the string around a gear to increase tension. You’ll need a pinion or worm gear as well.
Rosettes are inlaid patterns around the sound hole that distinguish your guitar, and common designs include flowers or botanicals to match the term “rosette.” You can overlay the soundboard with your drawing template to mark the guitar for drilling the sound hole and drilling a surrounding gully to attach commercially made decorative rosettes.
Pickguards, aka scratch plates, can be made of wood, metal, acrylic or a more exotic material. Bridge pins, usually made of wood, bone or polycarbonates, position the guitar strings precisely over the bridge.
Classical guitars often use tie blocks instead of pins. The saddle is a piece of plastic or bone that lifts the strings to the optimal height.
Bending the Curved Parts
Bending the sides is one of the tasks that seem more daunting to guitar builders than any other step in the building and assembly process, but the actual process can be easy with the right tools and design. You should cut pieces of plywood in the shape of your guitar sides.
Cover the bending surface with aluminum flashing, and create a steam box or use a commercial bending iron. Clamp the wood to the mold, and you can bend the side pieces easily once they’re properly heated or steamed.
Finishing Key Components
At this point, it’s time to assemble as much of the guitar’s body as possible. You’ll need some wood for bracing the front and back from the inside.
You can use glue to connect the different pieces of the body, and use clamps to hold the pieces in place while the glue dries for 24 hours.
Drill the sound hole and channels for any rosettes that you want to add for design purposes. Add the guitar neck, and reinforce it with a block.
Guitar necks can be quarter- or flat-sawn, which depends on the dimension, construction technique used and personal preferences. If you’re uncertain, play instruments with flat-sawn or quarter-sawn necks to see which you like best.
Now just start playing guitar!
Reinforcing the neck is critical. Most people use truss rods to prevent the necks from twisting or warping.
You can attach the neck to the guitar body with nuts and bolts. Blanks for bolt-on necks are widely available, and these are usually 13/16″ thick.
You need to thin the blanks to ¾” to match standard Fender specifications for ¼” fingerboards. Standard fingerboards are laminated, which reduces some of the steps that would otherwise be necessary.
The finishing process is where you address the issues of setting up your guitar to prevent fret performance problems like string buzz. Doing the work will take some time and consists of setting up the guitar strings at the right height, leveling the fret and grinding and polishing the fretboard.
You can take your guitar to a professional to set it up as well, a good option for inexperienced players.
Choosing A Guitar Body Shape
You ought to begin by designing the right body shape for your guitar with using guitar body templates. You should’ve a concrete idea of what your preferred guitar model will be in appearance and what it’ll feature.
You can come up with a unique design or borrow ideas from the existing models such as Gibson SG or Fender Telecaster. You may create your instrument as angled, rounded, or craft it in a flying V design.
The choice is solely yours, and as your preferences guide you, so be it. You can also choose to design your guitar in a circular or square shape.
You can choose between a double or single cutaway depending on the frets levels you need or forgo the cutaway altogether.
Selecting Materials
Select the right materials for your guitar. This selection will include selecting the right body for an ideal electric guitar.
You’ll have mahogany, swamp ash, alder, or maple as the main options that make the best bodies. For the neck, mahogany and maple are known to produce the best for the electric model of guitars.
Each of the woods chosen for the body will have a unique influence on tonal quality. The thickness of the wood also influences the tone produced by a guitar.
Heavy and highly dense wood gives thicker tones while a lighter wood produces brighter tinny sounds.
Selecting Necessary Guitar Hardware and Parts
Make a checklist and purchase the necessary hardware. You wouldn’t wish to miss a single part during the assembling hence the need to compose a list of all the parts required for your preferred model.
These parts will have different looks and capacities when used in a guitar. You should thus be ready to choose parts based on the guitar models you’ve seen before or be willing to try something new.
Luckily, you can readily acquire all the parts you need from a nearby guitar outlet or purchase them from a reliable online store. The primary components that you’ll need for an electric guitar include: a nut, switch for pickup selector, tuning pegs, a bridge, pickups, input cable, knobs, strings, tone, and volume controls.
Other optional parts that you may acquire are the truss rod, pickguard, and strap pegs for your universal guitar straps. Fret wire is necessary if you intend to build a guitar neck on your own.
Get yourself a pre-manufactured guitar neck. This applies where you don’t possess the do it yourself skills to craft a standard neck for the instrument.
The neck is considered one of the most sophisticated components, thus the need to purchase one.
Make sure you’re armed with the right working implements and knowledge. If you make efforts to acquire a premade neck, the rest of the task of creating a guitar of your choice doesn’t require any sophisticated tools or expertise.
The process may not be really friendly and seamless for a total guitar beginner. You’ll need some basic knowledge to use tools such as drills, saws, solders, and sandpaper.
You should as well have these tools with you or have the plans to access them once needed. The good news is that you can create your electric guitar using hand tools only.
However, you’ll make things easy and free of hassle if you can do yourself a favor to acquire an electric drill, router, and a jigsaw.
Purchase a guitar kit for a seamless process when making your guitar. Several firms produce fully loaded kits for electric guitars that you may need to make one.
Your only task once you buy such a kit will be assembling the parts. You may, however, not get the full exposure of creating a guitar from scratches.
Despite this, you’ll attain satisfaction when putting the parts together and finishing the entire process all by yourself.
To put your into shape, you ought to cut the body segment. Use your guitar design by laying it on the wood and tracing the design shape into it.
Use the saw to cut the wood while drawn outline following carefully. Sand the edges and the sides of the blank after you cut it.
Choose the positions to fix the body parts by making their relevant spots on the body blank. Draw a clear line along the center of the body for your reference.
You then have to draw marks on the bank to indicate guitar parts such a volume and tone control, as well as pickups, will be fitted. You can use the layout of an existing guitar or select the format the feels good for you.
You also need to route the guitar body. Make holes that go partially through the body bank at the rear aspect for fitting the electronic parts such a tone, volume, and pickup controls.
Another cavity will be needed in the front aspect of the body to fix the pickups. The depth of these cavities should follow the recommendations given by the pickup manufacturer.
You as well need to create a cavity where the neck of the guitar will attach to its body. It should be sufficiently deep and wide to attach the two parts firmly.
Use the drilling tool to make holes for the electronic parts. The marks you made on the body blank will now be used as a guide here.
Also, the hardware kit that you choose will direct you to the exact position and the total number of holes needed. Make holes for crucial parts such as bridge, pickups, volume and tone control, cord input, and a hole for your strap pegs.
Create additional holes to accommodate pickup strings to cross from the back to the front cavity.
Finish Work On The Guitar
The body now needs a touch of finish or paint based on your preferences. The creativity you applied when making the guitar will be depicted in the elegance of its body appearance.
You must, therefore, use your imagination to make it look as amazing as it can be. A proper paint (how to paint a guitar) or a finish will help you here.
You may use a simple oil finish, colorful matte or gloss finish or choose a combination of colors to bring s striking pattern.
The next step here involves cutting of the neck in case you never bought a ready-made model. You’ll be needed to cut the neck of your guitar into the appropriate width and thickness.
The headstock must be left wide enough to fit the tuning pegs. Use the sandpaper to sand the neck until you achieve a smooth texture and look.
Join the neck to the body of the guitar. You’ll need to use lamination or bolts to do in this case.
Firmly fix the neck to the cavity that you made earlier for this function. Use glue or bolts running through to the back from the top of the neck to hold these two parts together.
It’s now time to fix the bridge to the guitar’s body. You’ve several bridge options to make your guitar quite fantastic.
The design of the instrument will determine the exact directions to attach the bridges.
Guitar Electronics
The final critical bit lies in the installation of the electronics. Begin this part by dropping the electronic parts into place.
Ensure the pickup wires run via the holes that you drilled earlier. Use the cavities that you made on the front aspect to place the pickups.
Use the screw given by the manufacturer to fix the pickups in place. Fix the controls for the tone, pickup, volume, and cord input using the same criteria.
Remember to use solder to fix the electronics. The pickups come with a schematic manual that directs you to connect the controls to the input cord.
Follow the schematic directions to have things done. Use electrical tape to cover the wiring connections if the manufacturer doesn’t recommend an alternative approach.
Lastly, it’s time to string the guitar and put it to test. Remember to use your preferred string gauge and play it if the strings are in place.
Start by playing the guitar while unplugged to check if everything is alright. If all is well, you may then plug it in and play.
If at all this happens seamlessly, you’ll have your guitar ready and done.
Education and Fine-tuning Your Guitar
Additional research will be required to choose your acoustic guitar style and produce accurate templates of the different parts needed. If you don’t have the skills for woodworking, you might want to educate on the skills needed to build your guitar.
Guitar kits are a practical option for anyone who’s in way over his or her head. It’s also a good idea to choose a helpful local hardware store.
Big box stores are nearly impossible to navigate and find what you need if you don’t have a lot of experience.
Frequently Asked Questions
How long does it take to build a guitar from scratch?
A build that uses a kit or premade parts can come together over a few weekends, especially once you factor in time for glue and finish to cure.
A full from-scratch build, with a hand-shaped neck, bent sides, and wired electronics, can stretch over many weeks or even months. Because you set the pace, you can take as long as you need to get each step right.
Is it cheaper to build your own guitar?
Not necessarily. A basic kit can come in cheaper than a comparable store-bought instrument, but once you add quality tonewoods, hardware, pickups, and the right tools, a from-scratch build can cost as much as simply buying a guitar.
The real payoff is the customization and the satisfaction of playing something you made yourself, rather than pure savings.
Do I need special tools to build a guitar?
You can build a guitar with hand tools alone, but a few power tools make the job far easier. Most builders rely on an electric drill, a jigsaw, and a router, along with clamps, a block plane, and sandpaper.
If you’re wiring electronics, you’ll also need a soldering iron. Borrowing tools from friends or using a kit are good ways to keep your first build manageable.
Final Thoughts
Building a guitar is demanding, but it’s one of the most rewarding projects a player can take on. Whether you start from a kit or shape every piece from scratch, the process teaches you how the instrument works and creates a bond with the guitar that can make you a better, more attentive player.
Set realistic expectations, gather the right tools, lean on experts when you get stuck, and take your time with each step. The result is an instrument that’s truly your own.